Fujifilm Color Chrome Effect: How To Recreate In Affinity Photo
This is how to create Fujifilm’s “Color Chrome” effect in Affinity Photo.
Back in 2017, camera nerds (myself included) were very excited by the arrival of Fujifilm's first digital medium format mirrorless camera: the Fujifilm GFX 50S.
It featured a sensor 1.7x larger than your usual full-frame 35mm digital camera sensor, in a small body, and promised incredible resolution and that oft-desired "medium format look". And all for considerably less money than the, at the time, current crop of digital medium format cameras.
The GFX 50S included Fujifilm's "film simulations", much like Fujifilm's previous APS-C sensor X-series cameras, but added an extra feature for this medium-format beast: the Color Chrome effect.
The inspiration behind the Color Chrome effect
According to the Fujifilm-X website:
The inspiration for this look comes from FUJICHROME Fortia, a color reversal film that was only available in Japan between 2005 and 2007. Fortia famously promised "more contrast and color than Velvia". The ultra-saturated look that Fortia delivered attracted a cult following, but because it was only made in limited quantities, not many photographers had the chance to try it - until now!
To give you an idea of what colours you could achieve on Fujichrome Fortia film, I've included some slides below:
Photo: biel* "hello, colors of summer!" by * tathei *
Photo: F1000034 by Vega Tenor
Photo: Untitled by akino ringo
As you can see, the colours on Fujichrome Fortia SP are rich, vibrant, and deep... but I wouldn't say "out of control". They're not Agfa Ultra 50 colours.
To my eye, and of course you're free to disagree, I find these colours just wonderful to look at.
Fujifilm sought to bring back those rich and deep tones of Fortia SP for their new Fujifilm GFX50s medium format camera. The result is called the Color Chrome effect, available in-camera in two strengths: Weak or Strong.
Quoting from Fujifilm-X again:
Usually, when photographing colors such as red, orange, or green under high-contrast conditions, it's easy for an RGB color channel to become overloaded - as if individually too bright. Under these conditions, with contrast and brightness at a maximum, there is no room for a full range of tones and the scene tends to look a bit flat. But with Color Chrome switched on, subtle differences of tone can be detected and enhanced. The result is a punchy, high saturation image that doesn't lose its impact and depth.
This in-camera setting was later ported over to several of Fujifilm's X-series of APS-C mirrorless cameras, such as the X-T3 and the T-30.
Older X-series cameras, such as my beloved X-T2, may never gain this setting.
But, I think I figured out to replicate this in Affinity Photo (you can translate this guide to Photoshop, if you want).
Here's how.
The Fujifilm Color Chrome effect tutorial
The image we're starting with I downloaded from DPReview's X-T4 sample gallery.
Photo by Richard Butler for DPReview. Processed in Capture One, no noise reduction and no sharpening using the Provia (Standard) film simulation.
After some personal edits of the RAW file (change from Provia to Velvia, slight vignetting and minor contrast curve), this is the edit that I'll be applying the Color Chrome effect on.
Step 1: Load your edit in Affinity Photo.
Step 2: we're gunna first apply a small degree of colour boosting using Affinity Photo's curves adjustment. So add a Curves Adjustment layer.
Step 3: switch the colour mode of the Curves Adjustment from RGB to LAB.
Step 4: Switch the channel you want to edit from "Master" to "AOpponent".
Step 5: drag the bottom-left point of the Curve to the first line, then drag the top-right point to the third line. This creates a very extreme "s-curve". Working in the LAB colour mode allows us to modify only the Chroma (colours) of the image without altering its Luma (lightness). The colours affected in the "AOpponent" channel are Red and Green.
Step 6: switch to the "BOpponent" channel and repeat the same curve. This will affect the Blue and Yellow colours in the LAB colour mode.
The colour boost will be very strong, so feel free to reduce the opacity on this Curves Adjustment layer.
Step 7: we need to create a mask that will allow us to target only the colours that are strongly saturated i.e. a Saturation Mask. You can make one using a Selective Colour Adjustment layer.
Step 8: first, make sure you uncheck the "Relative" checkbox in the Selective Colour Adjustment window.
Step 9: for each colour in the Colour dropdown list, you'll want to move the "Black" slider all the way to the left. In this instance, we're already in the "Reds" colour, so slide the "Black" slider all the way left, to -100%. Then do some with Yellows, Greens, Cyans, Blues, and Magentas.
Step 10: for the next three "colours" in the Selective Colour Adjustment window ("Whites", "Neutrals", and "Blacks") you'll want to do the opposite and slide the Black slider all the way to the right, at 100%.
You'll end up with a weird grayscale image.
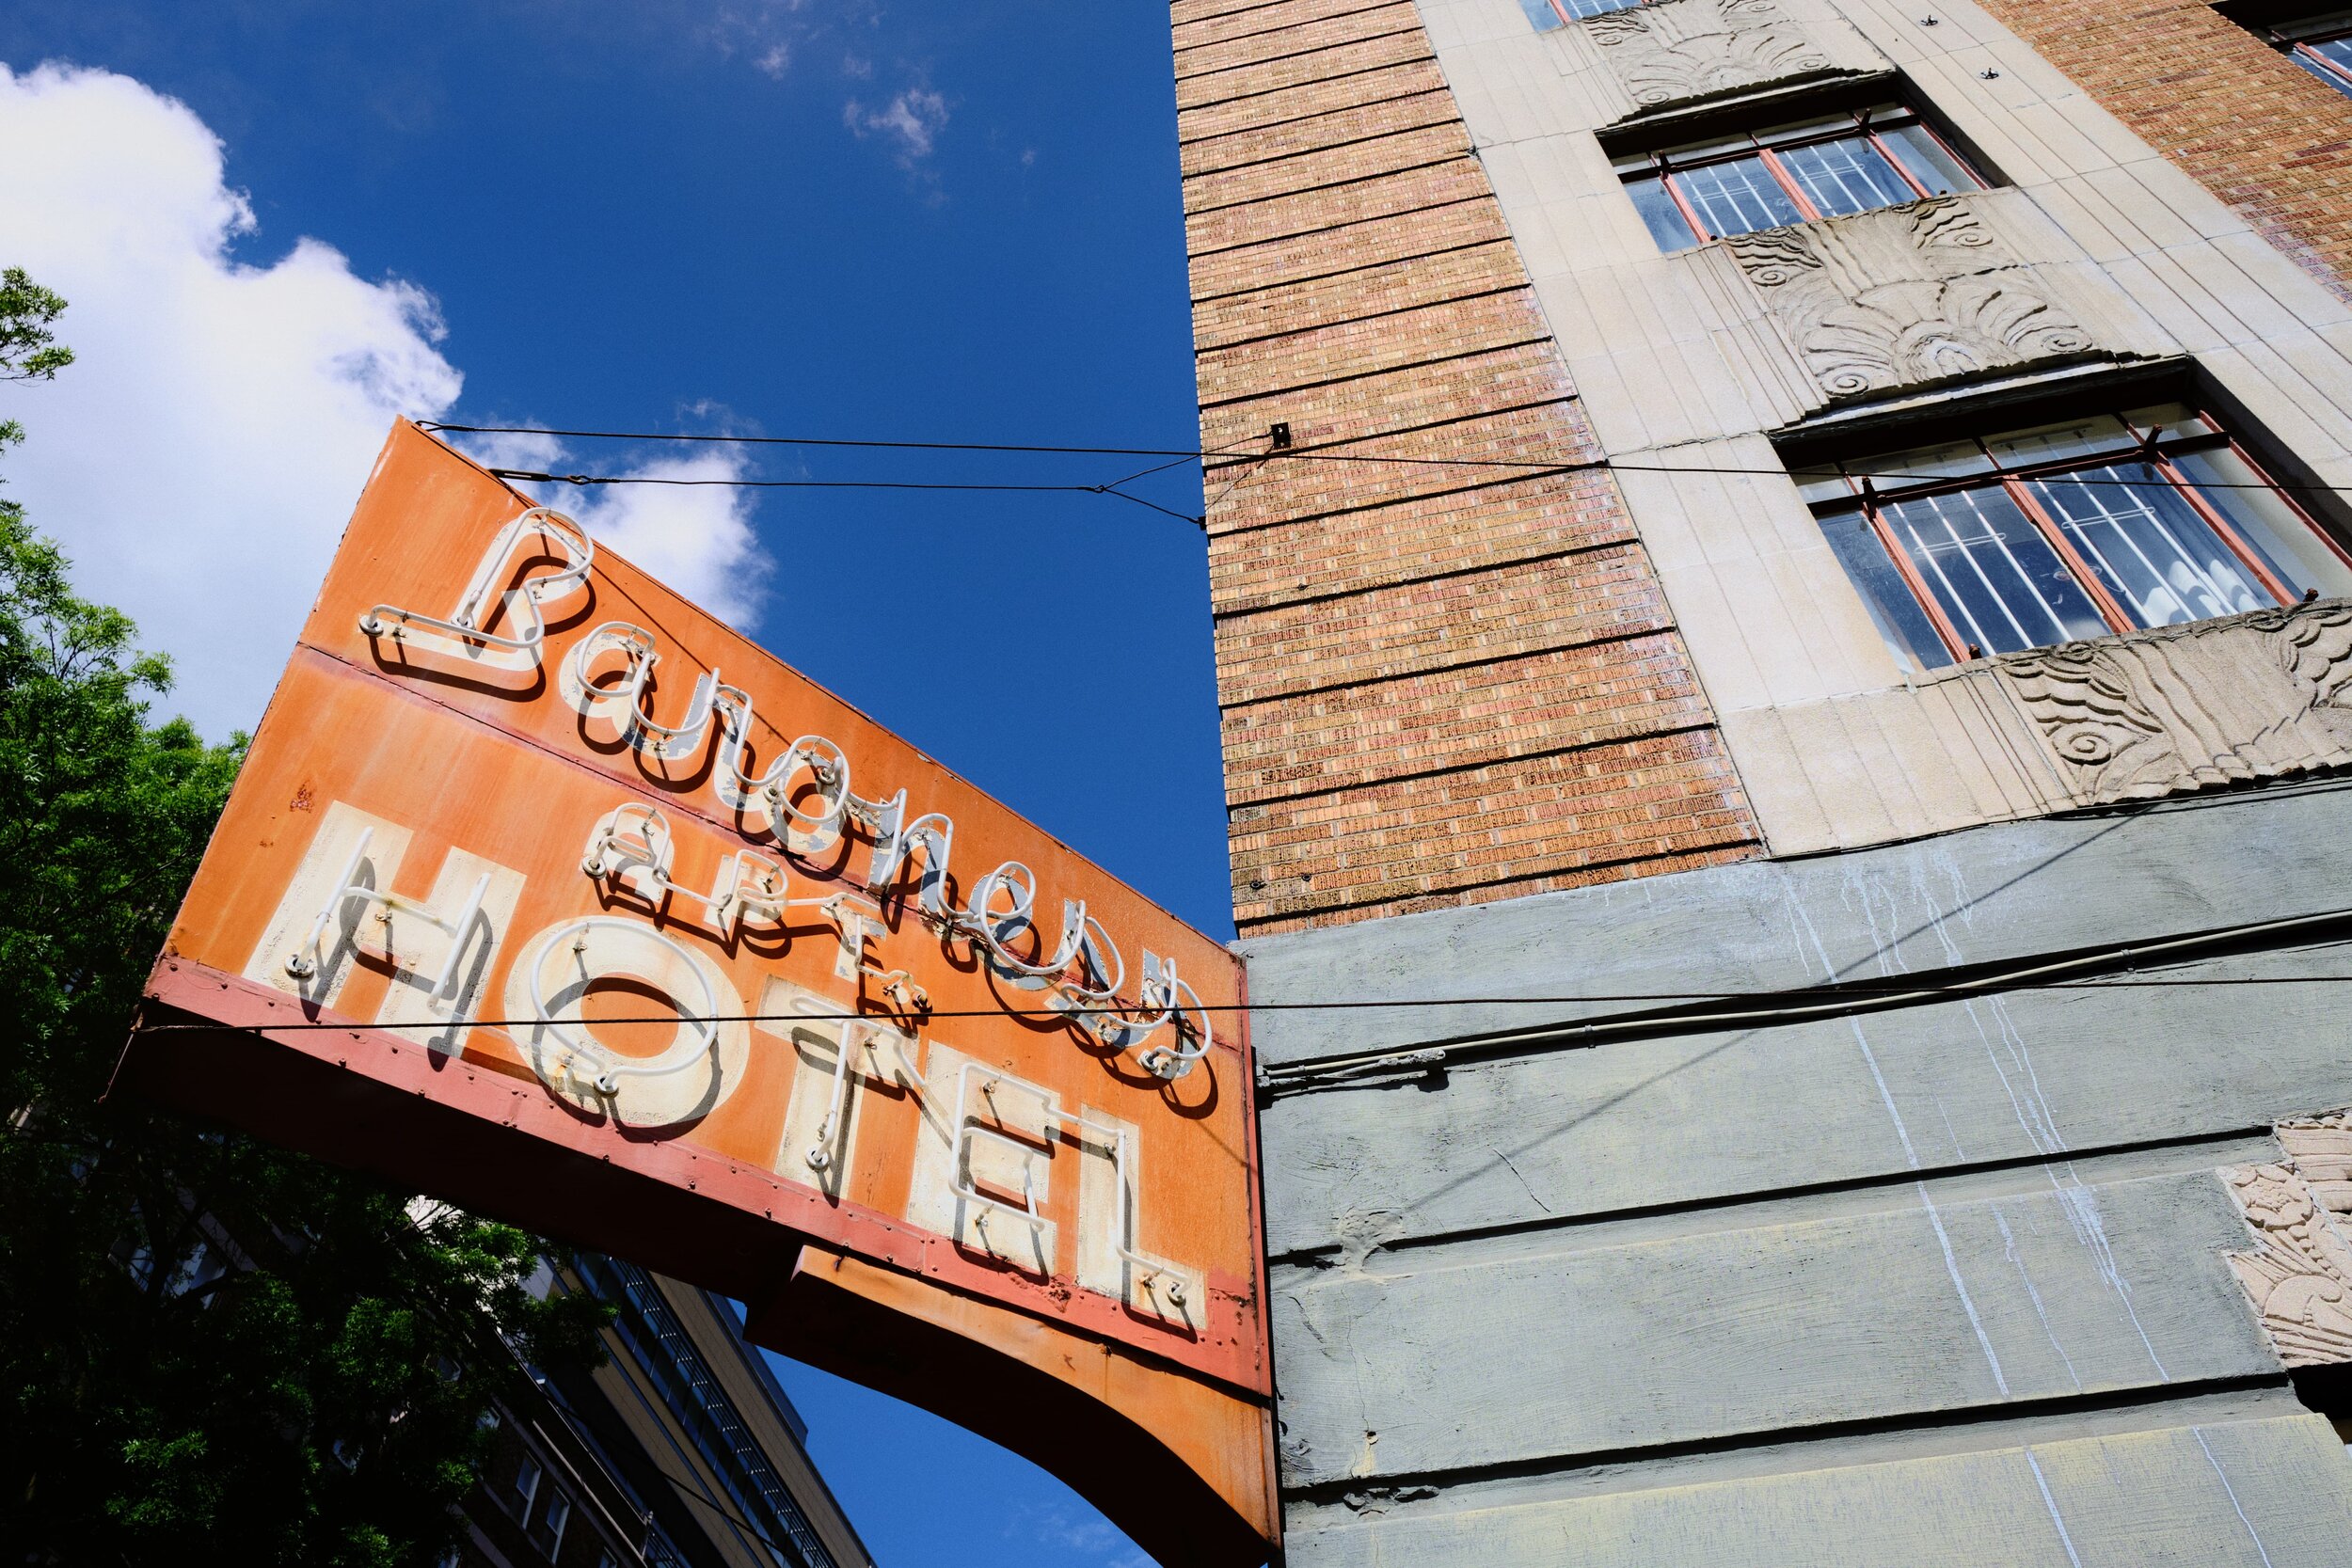
This is your Saturation Mask. It's a grayscale interpretation of where your most saturated colours are in the image. The closer to white the mask is, the more saturated a colour is. The closer to black the mask is, the more desaturated a colour is. In the image shown, the sign (which we know is red/orange) is very bright in this mask, indicating that the colours here are very saturated. Conversely, the grey wall towards the bottom-right of the image are represented as nearly black in this mask, telling us that the colours here are very desaturated.
Let's convert and save this into a mask.
Step 11: create a new "stamped" pixel layer of the Saturation Mask. Go to "Layer" in the menu, then "Merge Visible".
This will create a new pixel layer on top of your layer stack, filled with the Saturation Mask.
Step 12: right-click on the thumbnail of this new Pixel Saturation Mask layer and select "Rasterise to Mask".
Parts of this pixel layer will now go slightly transparent. This is fine.
Step 13: in the Channels panel, right-click on the thumbnail labelled "Mask Alpha" and select "Create Spare Channel".
This stores the Saturation Mask as a Spare Channel, for later use.
Back in the Layers panel, you can now safely delete the "(Mask)" layer and the "Selective Colour Adjustment" layer.
Step 14: this is the final stretch. Right-click on the Spare Channel you created, which contains the image's Saturation Mask, and select "Load To Pixel Selection". You'll get some "marching ants" dancing around your image, indicating that a selection is active.
Step 15: with the selection active, create a Curves Adjustment layer and change its Colour Mode from RGB to LAB. This new layer will load the selection you've made onto the Curves Adjustment layer as a mask. In short, you've added the Saturation Mask onto the Curves Adjustment layer.
This now means that any adjustment you make to this Curves Adjustment layer will affect only the most saturated colours in the image, because this adjustment is controlled by the Saturation Mask attached to it.
Step 16: change the channel in the Curves Adjustment window from "Master" to "Lightness".
Step 17: create a point in the middle of the curve and drag it down to darken the tones.
Because the Curves Adjustment is in LAB colour mode, and we're editing the Lightness channel, the edit we're making to the curve is only affecting the image's Luma (lightness), and not touching any of the colours. Furthermore, because we have a Saturation Mask attached to the Curves Adjustment layer, this means we're darkening the brightness of only the most saturated colours in the image.
This is the Color Chrome effect.
Let's have a look at some comparisons, shall we?


Conclusion
Do you think this is an accurate replication of Fujifilm's in-built Color Chrome effect? Do let me know, especially if think any improvements can be made.
Free Downloads
If you use Affinity Photo, I've created some free Macros that will automate the creation of the LAB Colour Boost and the Saturation Mask, important steps to recreating this Color Chrome effect.
Download: LAB Colour Boost
Download: Saturation Mask
Pandemic Peregrinations: Scout Scar, Cumbria, Spring
I’ve had a hankering for getting up Scout Scar for a little while now…
The limestone cliff of Scout Scar, which suddenly drops 100 ft or so down into the Lyth Valley.
I’ve had a hankering for getting up Scout Scar for a little while now.
As I’ve mentioned on this site many times before, Scout Scar holds a special place in my heart. It was here that Lisabet and I spent our first morning together, and it was also where I truly, madly, and deeply fell in love with the Lake District.
After consulting our maps, we took a new (to us) route up to Scout Scar from our front door. And it was rather delightful! The weather was much cooler today, with a stiff breeze, and with little cloud cover, giving us lovely light to work with.
If you’re curious about the name “Scout Scar”, the aspect scar ultimately comes from the Old Norse sker, meaning “to cut”, and was often used in reference to cliffs or other rocky outcrops and islands that were “cut” from the land (it’s the same root as “skerry”).
The main roads are still eerily quiet.
I love the criss-crossing of drystone walls.
Looking back down the route we were taking to Scout Scar. In the distance lies Kendal, with Benson Knott to the left, and even further in the distance you can make out the gentle rolling hills of the Howgills.
This is where the track takes you, right out onto the edge of Scout Scar. In the distance, the Eastern Lakeland Fells.
Standing right on the edge of Scout Scar’s limestone cliff, looking down the sheer drop to the Lyth Valley below.
Following the line of the limestone escarpment all the way north.
The northwards limestone escarpment of Scout Scar. You can just about make out the sea of Morecambe Bay to the right.
A runner ahead of us, as we take the route back down to Kendal from Scout Scar.
Even in the “middle of nowhere”, somewhere around Scout Scar’s gently sloping eastern side, you can find a beautifully wrought iron gate.
Heading back down to Kendal town centre via Beast Banks, one of the steepest roads in Kendal. In the distance rises Benson Knott.
Pandemic Peregrinations: Bird's Park Reservoir, Cumbria, Spring
The weather’s really been glorious in the last week or so. Thankfully, it’s made our daily One Government Sanctioned Outdoor Exercise Session Per Day a lot more pleasant.
The weather’s really been glorious in the last week or so. Thankfully, it’s made our daily One Government Sanctioned Outdoor Exercise Session Per Day a lot more pleasant.
About a week ago we ventured from our front door up towards Fisher Tarn, once dammed for use as a reservoir in the 19th century to support Kendal’s growing population and importance as a textile centre. During that walk, as part of consulting our map, we learned there was another nearby reservoir and vowed to visit on a future wandering.
Today was that day, and the reservoir in question is called Bird’s Park Reservoir.
This reservoir proved more difficult to access. In fact, we never actually saw the body of water, despite almost being upon it. The route to its dam was padlocked (no idea why), so we took the track to its northern tip. However, it seems that Bird’s Park Reservoir has long been abandoned, even though it’s still owned by United Utilities. Most access gates around the reservoir were rusting and padlocked, and the area was very much being reclaimed by nature.
Nevertheless, despite not actually being able to see the reservoir, we enjoyed a wonderful walk. The woods around the reservoir housed some beautiful trees, and in a month’s time will probably be full of bluebells. Above the reservoir is Paddy’s Lane, which we’ve hiked along before and offers enchanting views towards Kendal, its valley, and the Lakeland fells beyond.
In other news—as of the time of writing—78,991 have tested positive for COVID-19 from the Coronavirus in the UK, and 9,875 have died from it. May all those suffering find peace.
Miller Bridge in Kendal. The River Kent is extremely dry at the moment.
Stramongate Bridge and its weir. I’m ready for more leaves on the trees.
The views quickly open up once you pop out of East Kendal from Sandylands. The Lakeland fells start to become apparent too.
This is the pedestrian tunnel that crosses underneath the railway line. My lovely Lisabet here, demonstrating how low it is (she’s around 5ft 3in and had to hunch over).
High Jenkincrag Farm with Ashstead Fell (469 m/1,538 ft) in the distance. I liked the framing of this composition.
Looking back up at the farms along Paddy Lane from lower down on the Old Sedbergh Road. Love the criss-crossing of all the drystone walls.
I’m a sucker for a meandering drystone wall, especially if they’re undulating over the folds of the landscape.
Pandemic Peregrinations: Fisher Tarn, Cumbria, Spring
The weather was warmer and brighter today, so on our Government Allotted Outdoor Exercise period we ventured up Park Side Road, passed Castle Green Hotel, through Singleton Park, and onwards towards Fisher Tarn Reservoir.
The weather was warmer and brighter today, so on our Government Allotted Outdoor Exercise period we ventured up Park Side Road, passed Castle Green Hotel, through Singleton Park, and onwards towards Fisher Tarn Reservoir.
Fisher Tarn was dammed in the 19th century to help supply more water to a growing Kendal town. These days its use as a reservoir is no more and is now known for fishing.
I hope you enjoy these photos from today’s wander.
In Kendal each “yard” (or “ginnel”, basically another word for “alley”) is numbered, and all branch off from the main road through Kendal. Dr. Manning’s Yard was formerly called “Braithwaite Yard”, where a George Braithwaite established a drysalter’s business in 1713, supplying dyestuffs, alum, fuller’s earth and other technical materials to Kendal’s world-famous textile trade.
At the junction of Park Side Road and Singleton Park Road you can spot a small lane that runs alongside the grounds of Castle Green Hotel. What we found was a cool, mossy, and quite beautiful lane that leads directly onto the farmland around Singleton Park.
The moss slowly envelops the dry stone wall.
Spring is here.
Plenty of North of England Mule ewes mothering their new lambs in the uplands above Kendal.
Managed to snag this shot of a ewe cuddling up with her twin lambs.
Cracking views from Paddy Lane, above Kendal.
Lovely lines created by the freshly mown grass and the contours of the land.
Resting in the shade of some trees near Fisher Tarn Reservoir. Plenty of daffodils about.
Pandemic Peregrinations: Kendal Castle, Cumbria, Spring
This time we made our way towards the river and scanned it northwards, branching off towards the northern path that heads up Kendal Castle.
It’s so easy to become lethargic when you’re having to spend most of your time in lockdown in your house.
Activity breeds energy. The opposite is also true.
Nevertheless, Lisabet and I mustered up the drive to head out for our Government Allotted Outdoor Exercise period. This time we made our way towards the river and scanned it northwards, branching off towards the northern path that heads up Kendal Castle.
There’s been a castle or some sort of fort here for around 800 years now. Its most famous claim to fame is that it was once the home of the Parr family, with Catherine Parr being King Henry VIII’s sixth wife, the only one who outlived him.
Despite promises from various forecasts of skies brightening up as the day went on, the conditions we enjoyed were nevertheless quite overcast with soft light to boot.
It’s still always nice to visit the castle.
In other news—or really the only news that’s occurring currently—41,903 have been “officially” infected with the Coronavirus in the UK as of 4th April 2020, with 4,313 deaths from COVID-19 recorded as of 3rd April 2020.
Stay safe, everyone.
Stramongate Bridge, dating from 1794, but there’s been a bridge here for centuries. Records from 1379 named it as De ponte de Strowmondgate.
What’s left of the castle’s walls and the keep.
You can see why a castle was built here: it offers unparalleled views of the town.
The largest part of the castle that’s still standing: the keep and its tower. Modern additions like the stairway have helped people explore the ruins more fully.
The main way back down to Kendal from the castle.
Kendal’s pretty. I never tire of it.
Miller Bridge, originally called Mill Bridge. This version of the bridge has been standing since 1818.
Pandemic Peregrinations: Kendal Fell, Cumbria, Spring
It seem to me that there’s a cruel twist of fate in action, that the weather in Cumbria should consistently become drier and brighter just as the whole of the UK goes on lockdown due to the Coronavirus (COVID-19).
It seem to me that there’s a cruel twist of fate in action, that the weather in Cumbria should consistently become drier and brighter just as the whole of the UK goes on lockdown due to the Coronavirus (COVID-19).
Nevertheless, during our Government Allotted Outdoor Exercise period, Lisabet and I hiked from the front door up to Kendal Fell, through its golf course, and back down.
After a fairly mizzly start to the day, the light this afternoon was wonderful and my camera was very happy.
Take care, and stay safe everyone.


